Most plane windows are awful to attempt and shoot aerial photos through. The thick, angled glass onto the flight deck generates enormous distortion and reduced quality, and the windows next to the seats are generally scratched.
That is not to say you can not take exciting pictures while traveling on a commercial flight. However, it is undoubtedly challenging considering the airplane will a fixed destination, and you are only along for the ride. There is no changing the course.
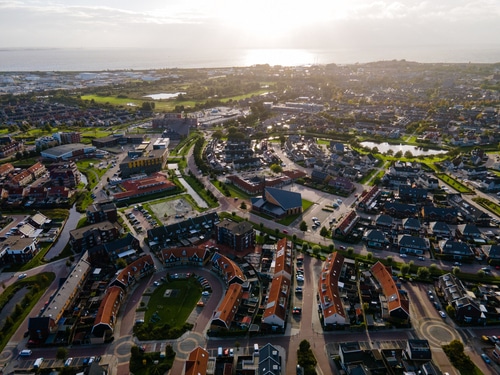
So if it’s almost impossible to take aerial photographs on your next airline flight, what is the point of this report? Expand your horizons a bit, figuratively and literally, and an entirely new genre of photography opens up for you.
Several options will allow you to acquire a birds-eye perspective of your topic based upon your budget and sense of adventure. Let us examine the three primary options from most to least expensive.
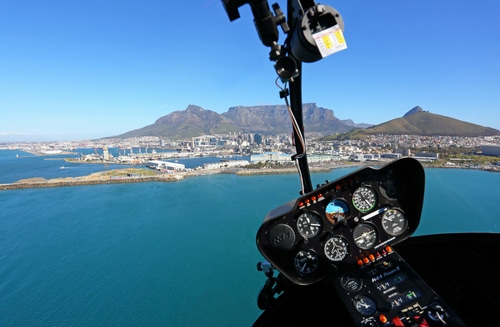
1. Taking Aerial Photos From A Helicopter
If high-quality aerial pictures are what you’re after, you just can’t beat shooting from a helicopter.
Normally, in a panoramic area, there is helicopter equipment offering excursions. In locations like Hawaii, sightseer helicopters are continually whirring around the islands, flying tourists all over the place. These are relatively economical but less than ideal for serious photography.
Many of these larger jet-powered choppers seat six passengers, and you aren’t guaranteed a window seat. Even if you’re fortunate enough to score one, the windows cause distortion and restrict your ability to frame a shot. The flight plans are pre-scheduled, so there’s no maneuvering to find the perfect angle.
If you are concerned about getting the best pictures possible, you will need to be in charge of this flight’s destination and time.
Fortunately, small piston-powered Robinson R22s (2 chairs ) and R44s (4 chairs ) are available for hire worldwide. The best feature of these turbines is the fact that the doors are easily removed.
If you have the courage to do this, being able to lean out the open doorway of your helicopter and ask the pilot where you want them to hover provides an uncompromising chance to produce the best possible image.
Now that you are on board and cleared for takeoff, there are a couple of unique considerations for your aerial photography expedition that has to be taken into consideration. Safety has to be paramount in your head, and you mustn’t get so wrapped up in the shooting experience that you lose track of your duties.
Firstly, you need to keep hold of your equipment. Wear your camera around your neck using a strap, and do not bring any loose gear with you. It would help if you didn’t change lenses, so we recommend getting two bodies with two unique lenses wrapped around your neck. A 70-200mm f/2.8 and 24-70mm f/2.8 will serve you well for many flights.
An 80-400mm or 100-500mm could be more appropriate based on the subject. Though it’s bulky and costly to carry two camera settings around your neck, if you happen to drop a lens through turbulence and it bounces into the slipstream, it could easily wind up in the tail rotor. Let’s say this would stop the flight in a rush for both you and your pilot.
Furthermore, it’s tempting to want to stick your lens from the open doorway while cruising along. You will quickly discover that a 100mph slipstream and a long lens do not mix well. Wait until you’re in a hover or at slow speed to lean out and get the shot.
Camera Settings
Helicopters are expensive. You don’t need to be experimenting with preferences as you’re hovering on your subject. Time is valuable, and you need to be sure that you’re getting sharp, well-exposed shots in the minute you reach above your topic. Enable us to pass along some techniques which have worked for me throughout my helicopter excursions.
For those who haven’t been up before, you will very quickly discover these small flying devices vibrate a lot. Vibration is passing to a sharp picture, so you’ll have to keep your shutter speed fast. 1/500th is as slow as you would go in a helicopter, and 1/750th or 1/10,00th provides you more insurance. Your pictures will be tack sharp and of high quality.
Since the same light principles apply in the sky as on the floor, you will typically be chartering your trip around a gold hour once the light can become rather dim. If you’re shooting one of our favorite topics, lava, you need very little light on the landscape to produce the bright red glow more striking.
This is why we recommended the lenses that have a maximum aperture of f/2.8. From above, depth of field won’t typically be a problem, so you need to shoot wide open to let as much light as possible.
Therefore, if you have set your shutter speed to 1/750th, the aperture is set to f/2.8 in manual mode, leaving ISO as the only adjustable part of the vulnerability triangle. Set the camera to Auto ISO and allow the computer to figure out the proper exposure.
But when the camera is essentially deciding the vulnerability, what metering mode should I use?
Typically, matrix metering mode generates the most natural consequences, but our taste for aerial photography is “Highlight Weighted”. This mode gives the best weight to the highlights and reduces the loss of detail.
Modern DSLRs (especially Nikon) do an outstanding job of enabling you to recover detail in the shadow areas given you’re shooting raw. At the same time, blown highlights are generally impossible to regain. Be sure after a couple of shots, you assess your histogram and see how your vulnerability is performing. If you’re overexposed, stop off your aperture or bump your shutter speed until the exposure comes into a range the Auto ISO can manage.
2. Using Planes For Aerial Photos
While the ability to put in a Helicopter allows for maximum control of your shooting environment, it is not the only way to take powerful aerial pictures.

Light aircraft are more prevalent, faster, and have greater range than helicopters. As an additional bonus, they are substantially less costly to lease. There’s a small airport with a local flight school in virtually every town in us that has pilots seeking to build time. It is not tough to prepare a flight at your preferred location and within your desired timeframe with a bit of leg work.
In Europe and the rest of the world, general aviation is more costly and not as common — but with some persistence, you should have the ability to obtain a flight just about everywhere.
Now, we should mention that all airplanes aren’t created equally. If you’re arranging a light aircraft photography flight, the true plane manufacturer is vital.
Cirrus and Piper both make excellent aircraft, but they’re low wing. This means that shooting will be near impossible because you’re sitting over the wing itself will block your view.
Cessna airplane has a high wing attached over you, so you have landing gear and a thin strut to contend with. If you intend to shoot right out in a passing hill, by way of instance, the low wing aircraft banked lightly will offer mostly unobstructed views.
These smaller airplanes are seldom equipped with air conditioning, but they have windows that allow for some airflow. Photographers can use this to their benefit by shooting through the open window to the cleanest possible shooter. Furthermore, some operators may be inclined to obliterate the door to provide you even greater access. Just make sure to avoid sticking out your lens into the slipstream.
The same settings and principles that work to get a helicopter photo tour operate in a plane. If the shutter speed is fast enough to cope with a helicopter’s vibrations, it is fast enough to freeze the horizontal movement of a small airplane.
3. The Best Way To Take Aerial Photos With A Drone
In 2013, a firm called DJI (heard of them?) launched the Phantom II drone, which revolutionized aerial photography. With a detector in the integrated digital camera that was complicated enough to catch workable images — photographers everywhere clamored to get their hands on one.
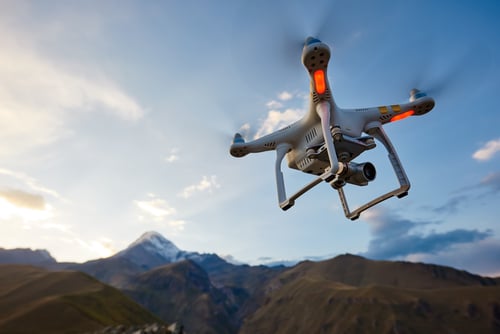
With each succeeding model, the picture and flying caliber of those consumer drones has improved, acknowledging excellent video and stills drone photography.
The comparatively low cost and conveniently tiny size of the drones mean everybody can explore endless views from the sky. However, with great power comes huge responsibility, and regulations and drone flying limitations are trying hard to keep up.
For example, in the USA, it is illegal to fly a drone in any national park. Some policies go far beyond the article’s purview for how high, how far, and how near people you can fly these nifty little gadgets. There is an infinite number of videos and tutorials about how to safely and efficiently operate your drone.
Instead of a long explanation of the technical menus and flight modes, we will share the strategies and techniques we’ve found to help capture successful aerial photos.
The raw files which come from DJI Ghost 4 Pro and DJI Mavic two are astonishing. We have come to expect exceptional detail and precision, even on windy days, and seldom are we disappointed. However, an individual shouldn’t expect the identical file quality as you get with today’s advanced DSLR cameras. So we are careful in how we take pictures to be sure we are maximizing quality.
For example, my Nikon D850 generates usable documents at ISO 9000. Drone files fall apart fast above ISO 400, and we try very difficult to shoot at ISO 100 whenever possible.
Both my drones have adjustable apertures. After some experimentation, we’ve discovered the sharpest images happen at f/5.6, which makes sense as it is close to the midrange of the lens’s aperture.
Shutter speed can be broadly adjusted based on what effect you’re trying to achieve. Many companies make CPL and ND filters for drone lenses, and we have had excellent results with Polar Pro filters.
The latest drones are amazingly stable, and it is possible to take exposures of several seconds in a moderate wind.
Despite these highest quality settings, we usually shoot multiple equal exposures to the pile and average them together during post-processing. This considerably reduces noise without sacrificing quality.
While dynamic range is excellent for such a tiny camera, it is not quite as rich as what you may expect from a DSLR, and so we usually mount ribbons to ensure we have information in all tonalities.
When you pull the files off the card and process them, you’ll see that a gentle hand works best. The pixels fall apart fast when pulled or pushed too hard in either color or luminosity. Speaking of color, we almost always need to decrease the quantity of cyan saturation within my drone files, so be careful that your eyes do not “adjust” to the cast before fixing it.
Most of all, enjoy yourself with your camera and capture some breathtaking views.