Back in the days of film, infrared photography was a complicated undertaking and so rarely used outside of scientific and beautiful art applications. The development of digital imaging enabled photographers to change to standard digital cameras affordably and recognize on-camera histograms easily, which provided opportunities for more widespread use of infrared.
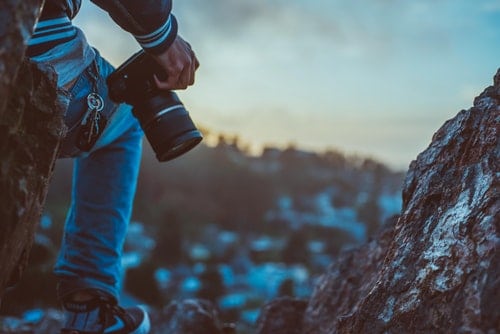
Now, photographers seeming to provide something unusual might find this alternative method a great option. As a photographer, you need to surprise your audience. Your ultimate goal is to create images that will cause people to have another look. Regardless of genre or topic.
How Infrared “Sees”
Infrared images show the way objects absorb and reflect light in the IR spectrum, which does not lie in the human eye’s visible range of light. Objects that show this section of the spectrum seem white, while objects that absorb infrared rays seem dark.
By making the “Invisible” Visible To Our Eyes
The act of ‘seeing’ entails mapping the environment. According to the kind of light, represented by the objects surrounding us.
Still, there is much more out there than what we can observe with our natural senses. These are beyond the visible light spectrum.
When we talk about the light we see, we are referring to electromagnetic waves. These are lying within particular ranges of frequencies (or wavelengths).
We recognize this as an ensemble of waves the ‘visible’ area of the spectrum. With greater frequencies than evident light, we have a UV light. At lower rates, we see the infrared light.
Sometimes, we can feel infrared as heat on our skin, rather than with our eyes.
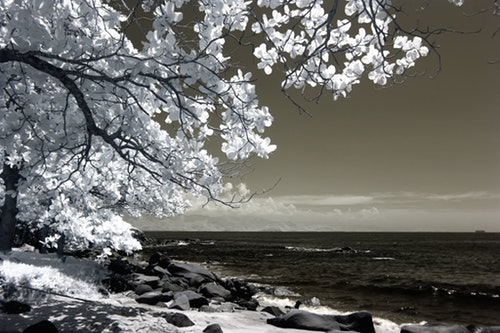
For this reason, dark and light usually appear reversed from a standard photograph. Flowers and foliage lead to show more IR light, representing them lighter, while the bark and tree stocks show less and look dark.
Bright or sunny skies seem very dark since all of the infrared beams are escaping the atmosphere. Blemishes and freckles often disappear completely. Eyes can seem like dark recesses, while sunglasses could be clear as their coating is expected to obstruct visible and dangerous UV rays but not infrared. Infrared light penetrates into the skin, making things like veins look darker and more prominent.
Once you know how infrared recognizes light, then you can begin composing images. Much of the progress of infrared portraits follow how to isolate subjects from their backgrounds in what can appear like an upside-down visual world.
For example, putting a figure in front of a clear sky (that will render quite dark) will generate a dramatic effect.
You really have to consider your compositions. Due to this, infrared images are more designed. It is quite like you’re trading a fancy. There is something regarding infrared that can pick the heartstrings like nothing else.
Essentially, it is a camera with a sensor that identifies heat radiation, instead of light. The neatest thing about it is the experimentation process since you never know what effects you are going to produce.
Launch An Infrared Product Line
Infrared photography is unlikely to replace your common style, but it can be a lucrative add-on. It is recommended to gradually work your way into it and building up interest in the medium by educating clients.
As a photographer, you cannot force on your clients that you’re going to include some infrared photography into their wedding or portrait session. Most clients won’t understand what it is, and you’ll need to show them.
Just include a few infrared captures at specific portrait sessions and at each wedding. The infrared shots work well for comprehensive views and emotive themes, not always as well for candids. It is recommended to make infrared a particular part of the method or a completely separate session if feasible. That way, it is possible to stage a setting that is conducive to infrared photography rather than attempting to fit it into a less-than-optimum situation.
Taking The Infrared Plunge
Like any new undertaking, you are going to feel trepidation when you start trying infrared picture making. Do not hesitate to experiment. Once you are used to it, infrared photography could add another dimension to your business.
Just try it out. Almost everyone that tries it gets hooked. It provides a new boost to your work. This is a tough industry with much competition. But when you’re able to find something, it gives your business a facelift.
Infrared ABCs
Get the equipment. You’ll require a digital infrared camera that has been custom balanced to the infrared schematic. No need to purchase anything new; a lot of photographers convert older cameras with great success. You require a lens that is calibrated to your camera for infrared photography as well as a lens shade. Standard lenses are not coated for infrared and can create a good deal of flare without one.
Discover your infrared conversion. Google “infrared conversion,” and you will find sites like lifepixel.com and kolarivision.com that feature different options. The 720-conversion is frequently used, which is standard, but the conversion you select is up to personal preference or what you think your clientele will choose.
Learn histograms, nail exposures, and shoot raw. Photography demands precise exposures, so master your technical skills before delving into this medium. As soon as you’ve done that, infrared is comparatively simple to learn. The histogram provides you all of the information to know if your exposure is correct. Shooting in raw provides the digital data you’ll need to process the file correctly.
Three Issues to Face with IR Photography
Many electronic systems (handheld light meters and in-camera light meters) and exposure rules (sunny 16 rule, etc.) use visible light in your mind. IR scenes may need a distinct exposure. Make sure that you do some bracketing before calling it a day.
Also, Infrared photography can divert your autofocus. If you have an unmodified camera, it is similar to trying to use the AF to focus on a subject at night.
You are better off with manual focus as the focus rate shouldn’t be a problem in this scenario. Digital infrared photography enables you to do this.
And then there is the notorious infrared “hot spot.” Lenses are constructed with visible light in mind. Due to the coating of the lens barrel of some lenses, an IR Hot Spot will appear on your images.
A hot spot looks circular, in the center of the frame. It is clearer than the surrounding part of the picture. And it has a different tint/color temperature.
Lens quality differs, and performances may vary based on the aperture value applied. Broader apertures are better than narrow ones. You are able to correct faint hot spots while editing.
Is Your Camera IR Ready?
Using your TV remote controller, hold down a button and point it at your came. Would you see (or picture) the light coming from the remote IR emitter?
If it’s possible, then you are all set!
The clearer you can see the IR emitter, the better it is. Although this means that the IR blocker installed in your camera is not really that efficient.
Must-Have Equipment to Start IR Photography
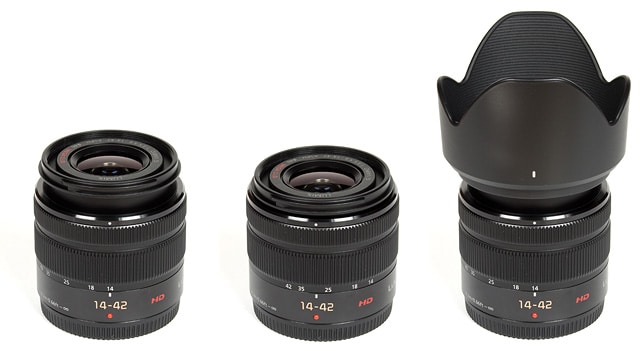
A camera with a sensor that can observe IR light! An individual can use the standard 14-42 kit lens.
A sturdy tripod. If you do not modify your camera, you will be doing long exposure to digital infrared photography. The use of a strong tripod is necessary.
An IR filter. You will need to put a filter in front of your lens, which will block visible and UV light while allowing IR light to pass. An excellent filter, to start with, is the HOYA r72 IR filter. It will obstruct all light with a wavelength of less than 720nm. Practically, this indicates that a bit of visible red light will still pass through the filter and hit your sensor. This isn’t bad at all. That ugly red image you will see on your LCD, while ugly, is helpful for manual and composition focusing.
Forget About Golden Hours, Stormy Weather and Overcast Skies
All You Want Is Sun! Landscape photographers swear by the blue and golden hours. This is to benefit from the best quality of natural light.
However, a lot of people have other things going on in life, odds are that you aren’t likely to see many golden/blue hours. Additionally, it is unlikely you could follow storms to take the most climactic skies.
Although the IR golden hour is midday, and taking excellent digital infrared photography is much more achievable.
Subjects for Infrared Photography
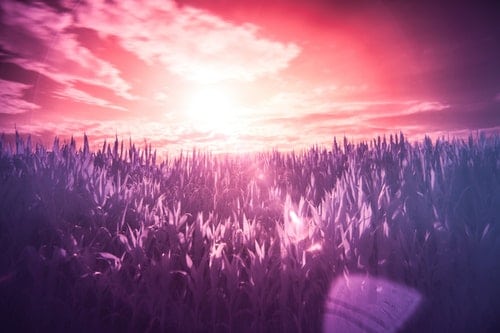
The most typical subjects for IR photography are landscapes. That is as they can look unexpected and usually.
Water and blue skies absorb IR light. But large-leaf trees, grass, and puffy clouds show IR light. The structure of an IR image is the differences between objects absorbing or reflecting infrared light.
Spruce and pine trees absorb quite a lot of IR light. Try a white and black conversion of your IR photo. You will see a sky with dark grey pine trees, puffy white clouds, black water, and white leaves and grass.
You are not confined to landscapes. Try photographing people: they may seem weird. Consider getting some macros of insects — you may be surprised by them.
Travel the city and observe how different materials in the buildings absorb or reflect IR light. Infrared photography can surprise the observer. It provides a different outlook of even a common or simple subject.
But this does not necessarily mean that a trivial or boring photo will turn into a masterpiece in IR. Composition methods still hold true, and boring shots will stay boring.
And let’s not overlook the side effect of removing people and traffic from your scene. You’re already doing a long exposure. Vehicles and people moving across the scene will probably be blurred away or eliminated.
This is terrific for shooting shots of monuments, buildings, and busy squares in addition to landscapes in crowded parks and town gardens.
Edit Your IR Photographs
Editing your infrared photos will take a few more steps than usual. How many will based on the final result you want to accomplish.
Develop a workflow. Infrared files are different, so you will want a post-production workflow to keep the infrared look. It is advised to use Lightroom and Photoshop in addition to Nik, Macphun, and Topaz plugins for post-production.
The initial step is fixing the white balance. Remember, the blue sky and water should be dark. Grass, leaves, and puffy clouds should be white.
Next, decide if you would like to go for a false or black and white color image and go from there.
Black and White IR
White and Black IR conversions are less remarkable at first. However, you will still see that something is not perfect.
False Color IR Conversions
A false-color IR conversion screams ‘weird’. You cannot be fooled, something is happening here.
The most simple thing is playing with the white balance. Try to make the places that ought to be black or white, their colors.
You will get an image with a general, orange tone. Surprise!
You can also try to restore more natural color to the water and sky. To do this, swap the blue and red channels.
You can perform this using the channel mixer in Photoshop. Also, if you have Photoshop Elements, set the tone for the master to 180.
Build a portfolio. You will want examples of your work, as some clients are not familiar with infrared photography. To make your portfolio invite customers to take part in a free session or offering to make IR pictures during their session at no additional cost. Suggest to them you’re trying a new beautiful art style and ask if they would be your models. As a thank, you give them a print for participating. Soon you’ll have enough of a portfolio to show and can book paying infrared sessions.
Experiment and expand. Learn the fundamentals and then experiment with digital painting, effects, or customized plug-ins to produce unique images that fit your brand.
Once you’ve done a couple of infrared pictures, show them to your clients. You can do these on spec initially, surprising them with the unique art procedure. After the work has taken hold and you’ve made your portfolio, you can start to cost extra for the specialty process.
Generally speaking, price the infrared images differently to make sure my clients know that they are unique, beautiful art pieces.